The Complete Guide To Semi-Hydro
You’ve just received your first bag of Semi Hydro mix, so what now? Well, regardless of whether you bought the mix with or without our slow-release fertiliser included, crack that bad boy open and pierce a small hole in the bottom! This is to begin the essential flushing process. A vital part of aggregate use is making sure no dust build-up occurs. Unfortunately transportation and general movement of these materials may cause some dust to deposit in the bottom of the bag, hence why flushing before use is so important!
The very best way to flush your medium is to remove the inner pot with the plant, and run water through for a minute or two in your sink or shower, ensuring any salt build up is totally dissolved and washed away.
Once flushed and ready to go, get your preferred Semi-Hydro compatible pot (even if this is a plastic pot in a cache pot) and begin shovelling in around 1/3 of the way up the pot.
At this point, if you have water props you're moving in, just pop them in and fill the rest of the way up to the top of the pot. If you’re transplanting a soil grown plant into this mix; be sure to thoroughly wash all soil from the roots before transplanting. When they’re nice and clean, just pop the root system and plant 2/3 of the way into the pot for maximum contact with the growing medium.

Transplanting a soil grown plant to semi hydro may result in some stress and shock, this can include some leaf yellowing and even root die back as the hydroponic roots form. This process is much much easier with the transfer between water propagated plants and semi hydro, the roots that have already formed will be totally compatible with the aggregate. With your soil grown plants, have a little faith and patience and you’ll have a much easier time with difficult to maintain species like Goeppertia, Anthurium, Philodendron, Ceropegia, Ficus and even Monstera. We advise using clear pots which will allow you to monitor and enjoy the roots growing and thriving!
How to water
So what are the basics of Semi-Hydro, i.e. watering?
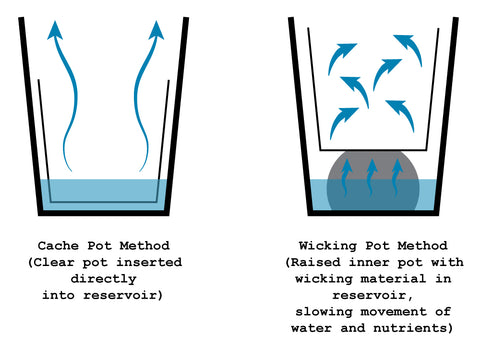
Well, this part is super simple! Just make sure your built-in reservoir is filled in self watering planters or just sit a clear pot with good drainage ¼ the way submerged for the best water and nutrient uptake! Check on your reservoir regularly to make sure it’s providing the necessary hydration to your lovely roots.
Now, every few weeks it’s extremely important to flush your inner pot, to remove any salt build up from hard water and nutrients, leaving this for extended periods of time can lead to root burn and we definitely want to avoid that.

Semi hydroponics can seem a little intimidating and if you’re nervous about fully jumping in why not just start with some experiments? Simply using props of Pothos, Monstera and Alocasia are a fantastic way to start your journey with this new growing technique helping you learn and get comfortable with the process. It’s not much different to soil based growing but if done right; can take your hard-to-please plants to truly incredible new heights (literally)!
What our mix does?
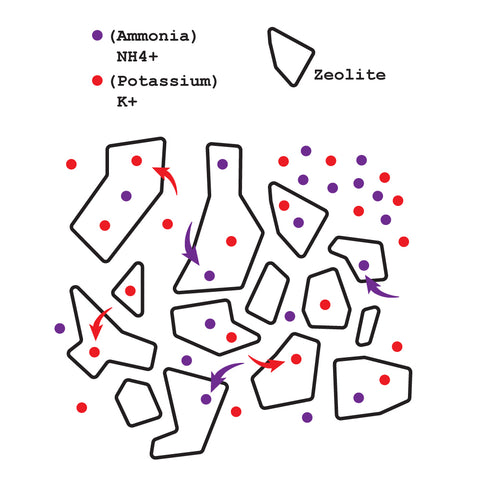
A truly revolutionary aspect of the hydroponics game is Zeolite, a brilliant detoxifying and buffering aggregate! It’s ability to remove excess ammonia and potassium (common causes of root burn and death) makes it the PERFECT main stage component in our mix!
The main structure is composed of highly porous and versatile materials that are second to none for up-taking nutrients and water and distributing it throughout the vessel with grace and ease. By nature these aggregates have no dedicated form, which creates the very best natural grooves and surfaces for a successful root system. Whilst the extremely porous macro structure supports primary roots and their need for anchoring, the micro-structure supports secondary, finer roots as they creep and crawl along the surfaces.
Another very important characteristic of these components is for buffering the movement of nutrients and water, slowing it down a little to make sure roots are not being constantly bombarded with nutrients and too much water. This drastically increases the air flow throughout the pot, keeping roots healthy.

Fertiliser - Our Semi-Hydro doesn’t include fertiliser. So feel free to add either our Slow Release or use your own favourite brand. We know that a lot of our customers have a go-to feed, so let’s not make things complicated and use what you love!
Our 8-9 month Slow Release provides all the required nutrients and minerals for brilliant root support and plant health. And after those 8-9 months are up, feel free to pick up a bumper pack and mix some extra in! Our fertiliser is a hearty NPK of 11-21-9 +6% Mg! It’s packed full of delicious nutrients to make your plants thrive!
Additional Uses?
This mix is just as suited to active hydroponics as it is passive! If you have a filter system or even a water cycle system, feel free to use this mix in those more active environments! And if you’re short on soil amendments in a pinch, feel free to use this as a completely neutral drainage mix to make denser soils a lot more root friendly.
We are truly excited to see how your filthy plant babes use and enjoy this mix so please tag us on Instagram: @Soil.Ninja to show how you grow hydroponically!
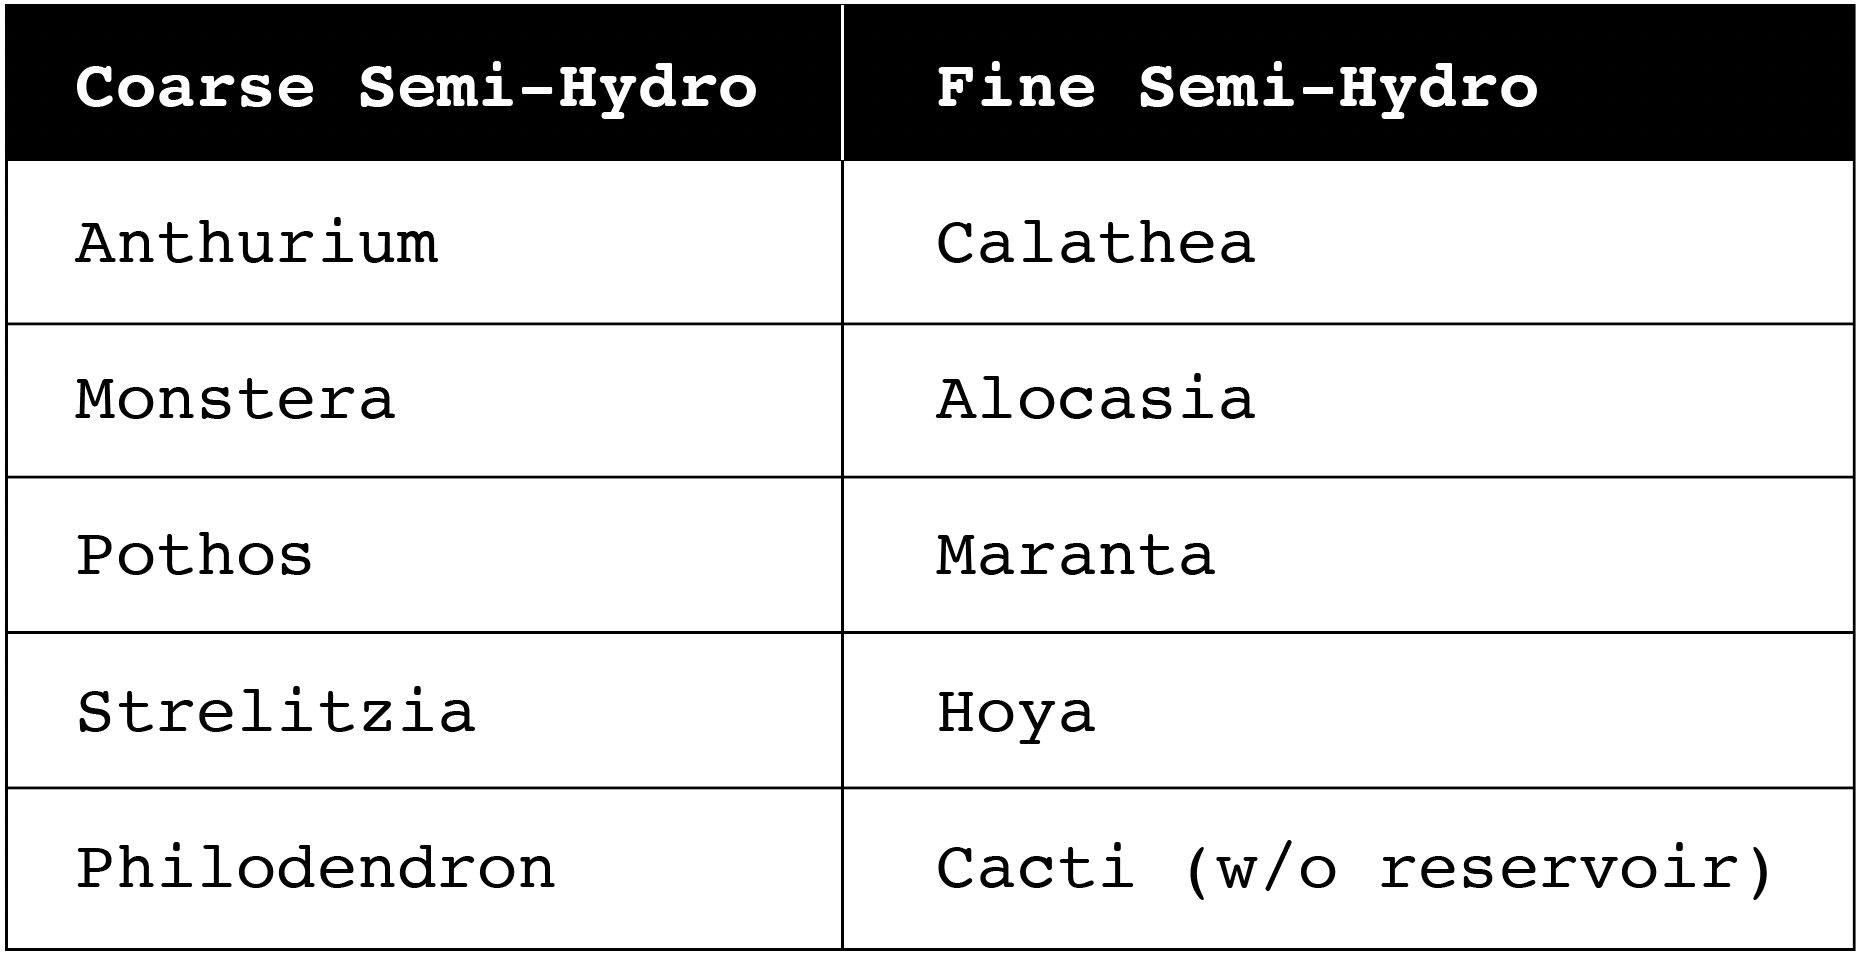
Coarse vs Fine Semi Hydro
So, now that you’ve swotted up on how semi-hydro works, its time to figure out which grade is most suitable for the plant. Both grades contain the exact same ingredients and ratios, so the only real difference between them is the air chambers they naturally form in the pot. Roots grow through air gaps in substrates, not the actual substrate itself! Therefore, its always wise to compare the thickness of the roots to the airspaces the substrate forms.
For thicker rooted plants (such as Anthurium or Monstera) we always recommend going for the Coarse grade, whilst fine rooted plants such as Calathea, Alocasia, and even Cacti would definitely prefer the Finer grade. Some plants it may depend on the maturity of the plant, for instance juvenile Philodendrons would definitely prefer the fine semi hydro, but a gigantic established Philodendron would find the airspaces in the fine far too small!
Cacti in Fine Semi-Hydro?
You heard it! Our Fine Semi-Hydro mix doubles up as a superb soilless Cacti mixture! However, it must be used slightly differently to the water reservoir set up for other plants. When used for Cacti, we recommend the same basic step of flushing through the semi hydro before potting it up, and also removing all the old substrate from the roots by giving the rootball a warm soak. Now once you’ve potted it up, this is where things change. Being drought loving plants, Cacti do not want a water reservoir beneath their pot. Instead, leave the Cacti in a sunny spot and allow the flushed Semi-Hydro it was potted in to fully dry out. Then after a couple of weeks it's time for the first drenching. Run water through the mix thoroughly, so that every bit of aggregate in the pot has absorbed a bit of water. Then, place back into it's sunny spot without a reservoir. From there on, you can water just like you would a normal Cacti – about once a month on average (more frequent in summer, way less frequent in winter!).
Plant Recommendations